Wednesday, December 9, 2009

Christmas Hanging Decoration/Blog Holiday

As you've probably figured out from my last few months of posts, I'm pretty much all jewelry all the time these days. I'll be taking a break from my blog over the holidays because not only is it a busy time of year for most of us, but I'll also be working on a new online webstore to sell my jewelry. Stay tuned for a January Grand Opening!

So I'm going to leave you with a Christmas project I made this summer before I got too busy with jewelry :) These hanging decorations are made from tiles from a stacking domino game. I just flipped them over & added paper inside (the letters are punched from scrapbook paper & the images in the smaller one are stamped). Then I covered them with Stampin' Up!'s Crystal Effects for a glossy finish. I used Sticky Tape to adhere the tiles to ribbon.  These can hang on a wall, on a doorknob or even on your tree! This would be a fun project to do with your kids too--make one with their names for their rooms :)


Wishing everyone a Merry Christmas, Happy Holidays & Happy New Year! See you next year--
Share/Save/Bookmark

Monday, November 30, 2009

Last Crafts Fairs of the Season!

One last plug for any locals out there--I've got my two last craft fairs of the holiday season this weekend! Come see my stuff  (IMHO it's much cooler in person :) )

Sat. Dec. 5 from 9 am -3pm: Fox Mill Elementary, 2601 Viking Dr, Herndon VA 20171

Sun. Dec. 6 from 10am -4pm: Herndon Community Center, Craft Fair Brochure with list of juried crafters

Mention that you read about it on my blog & get a chain for free with the purchase of any pendant!
Share/Save/Bookmark

Tuesday, November 24, 2009

"Mustard Seed" Bamboo Bead Pendant


This is so cool--my artist friend Vanessa commissioned me to make six of these bamboo bead pendants using an image of her very own artwork ("The Mustard Seed")! She's a mixed media artist with her own etsy store--check it out: TheHeARTGallery

After sizing the image, I printed them out and coated them with Mod Podge so that the ink wouldn't run. Then, I just cut them out and glued them on the beads. I hope Van doesn't mind, but I took a little creative license by adding some of Stampin' Up!'s Champagne Shimmering Paint sparingly on top. I've really come to rely on that stuff to add a little sparkly oompf to the images I use. Finally, I drip Colores Doming Resin on top. With the waxy & rounded surface of these beads, it works best to use the very end of your resin batch after it's thickened up some & use it sparingly. The resin really tends to drip off of these babies. If that happens, a hobby knife can be used to cut off the excess. I had to do that on a couple & then add a little more resin later where too much had peeled off in my effort to "fix" things.

I use wire to add decorative beads (the bamboo tile beads come from a placemat so they already have two holes drilled lengthwise through them--have a batch of them for sale in my etsy shop if you want to try this) and make a basic loop at the top. Finally, a bail is attached by a jump ring and threaded with a black satin necklace.

Share/Save/Bookmark

Tuesday, November 17, 2009

Monogram Charm Pendants

Here's one more gift for one of my jewelry party hostesses--a leather cord necklace with three pendants with the initials of her kids. These were made from the same silver 5/8" buttons I'd made the charms (in the charm bracelet post) from. The initials are stamped from Stampin' Up!'s Calendar Alphabet and embossed in silver on black cardstock. Then, I just had to show the backs so you could see the cute flower bails that they're glued onto.

Share/Save/Bookmark

Wednesday, November 11, 2009

Monogram Mah Jong Pendants


Some of friends of mine threw me a jewelry party last weekend so I made them these monogram pendants from mah jong tiles as a thank you. (They just "happened" to be on "Joker" tiles--heh).

These mah jong tiles are from an American Travel Mah Jong Set, which are thinner (1/8") than the regular chunky mah jong tiles. I really love working with them because I can stamp on them just like I do with dominos but the nice shape lets me fit bigger images. I've also found them in two sizes--these (which are ivory) & about 1 3/8" x 1" and smaller ones that are about 1 1/8" x 7/8" (mine are white).

For these pendants, I first colored them with chalk inks--a light coat all over, heat set it, then edged it with a darker shade & heat set. I used a makeup sponge to dab the ink around the edge, pouncing until it blended as I wanted. Then I used Staz-on for the images--a little flourish from SU!'s retired "Frames with a Flourish" at the top & then the initials (the "S" is from Stampin' Up!'s "Lovely Letters" set). It's hard to tell from the pictures, but I also went over the letters with a black glitter pen to add a little bling.

Finally, I added Colores Doming Resin for a waterproof seal, a large bail and a rhinestone embellishment to complete the pendant. It looks great with a black satin cord for a funky statement. :-)

I welcome custom orders so if anyone wants one or any of my other creations, just let me know and I can create a custom listing for you in my etsy shop.
Share/Save/Bookmark

Tuesday, November 3, 2009

Altered Art Charm Bracelet Set


Charms are such a fun way to personalize a bracelet. I've made tons of charms using Japanese Washi paper (as well as other kinds of specialty paper) sealed onto the flat side of silver buttons for people to choose from at my upcoming shows. To make the buttons into charms, I had to clip the loop off the flat side with a wire cutter & then sand smooth with my Drexel hand tool (came with a mini-sander tool--really cool). Then put on the paper, sealed with Mod Podge & then covered with my Colores Doming Resin. Finally, I glued the buttons onto the flat charm pads & attached them to the bracelet.

To make the ring, I just glued a charm button onto the ring blank. The pendant uses the same coordinating paper on a Sudoku tile (much like a Scrabble tile).
Share/Save/Bookmark

Tuesday, October 27, 2009

Bingo! More Halloween Earrings


Have to get in one last Halloween project--more earrings! I found this cute monster/Halloween paper to make earrings from bingo chips. The bingo chips are 5/8" in diameter & I have a circle punch just that size--yea! I love it when I don't have to trim or sand to get things to fit perfectly. I think the most fun part of making my paper-embellished jewelry is picking out the paper designs :-)

So, I always use a strong adhesive like SU! Crystal Effects to glue the paper to the chip--on things where the paper is the exact same size & so the resin may not even touch the chip, if it's not on securely, the paper, even covered with resin, can come right off! Ask me how I know...

Before spreading the waterproof Colores Doming Resin over the paper, I sealed it (front AND back) with Mod Podge--very important step!!
Once the resin cured (I leave it overnight), I screwed in the little eye-screws at the top (by hand--if you're patient, you don't need to drill a hole first) and attached the earwires.

This last picture shows the back of another pair so you can see what the bingo chips look like (I glue the paper to the actual back of the chip. The side with the numbers isn't smooth--besides, I think being able to see that something is a game piece makes it more interesting. For this pair, I'd actually drilled a hole through the chip and used an eye pin so that I could add a bead dangle. You could also just add a second eye screw too. I'm starting to get handy with the jewelry tools, I tell ya!

& if you really like my monster earrings--they're on sale in my etsy shop! (see side widget)


Share/Save/Bookmark

Tuesday, October 20, 2009

Haunted House Treats


The Bradley Farm Haunted House asked me to sponsor a room this year so I made these Halloween treats using "Batty For You." I made about 300 of these for a "monster" to pass out to the kids as they go through "my" room. These are pretty easy to make--but 300 of them do take a while (there's a whole 'nother plastic bag not pictured)! There was a lot of gluing during So You Think You Can Dance! The candy sandwiched inside the black & pumpkin pie cardstock are peanut butter caramels. The wax paper is not very conducive to adhesive--Snail won't stay but Crystal Effects & Tombow Mono will--you just have to press & hold for a few seconds (so yeah, ---took a while!)


Share/Save/Bookmark

Tuesday, October 13, 2009

Tile Coasters

I know I don't need any more new craft fair projects but I was reading on splitcoaststampers a discussion about them and decided I needed to try them. & when I try something, I end up making a bunch because I want to try different designs and then it's only worth it if I sell them & well...on it goes.

The main thing I learned is that there are tons of conflicting advice on the best way to make them. The consensus though is to use "tumbled" tiles from a home improvement store. These are the tiles that are porous and NOT glazed. I found ones that were 9 to a box so of course, I had to buy at least 4 boxes so I could have even sets of 4. I do recommend checking out each tile before buying though because they can be chipped or broken.

Next, I wiped off my tiles with a baby wipe front & back to get the dust off. Then I stamped the main images with Staz-on. Most of the tutorials say that if you use permanent inks or sharpies then you don't need to heat set the tiles to maintain the images. I'd probably heat set Staz-on before coloring with sharpies though just so the colors don't mix at all. I wanted to color mine with softer chalk ink so I did have to heat set. You can use regular chalks too with a Q-tip but I'd first put some Versamark on so the chalk stays better. I used a heat gun on mine after coloring with the chalk ink (most of the time I just used sponge daubers to color & then smudge with my finger to blend a little). I decided to be safe & went the extra step of baking the tiles in the oven for 20 minutes at 350 degrees. I just put them right on the rack. Finally, I sprayed them with acrylic matte sealer to protect the images from fading etc.

These coaster sets used Stampin' Up!'s retired "Summer by the Sea", retired "Celtic Knots" & the current "A Tree For All Seasons" (how did I live without that set until just last winter??) I could even see using some of them in a tile backsplash too!


Share/Save/Bookmark

Tuesday, October 6, 2009

Pumpkin Poop with My Digital Studio

I needed something else for the fall festival I'm doing on Saturday & decided to make "Pumpkin Poop" for the first time. It's definitely not an original idea--you can see samples all over Splitcoaststampers (& that's where I got the poem). My take on it was to try my first project with My Digital Studio (Stampin' Up!'s new digital scrapbooking & card making program) to mass produce these puppies.

The "Eat, Drink & Be Scary" set is included in MDS--which is GREAT because I don't own it! I love that you can do some things with the program you can't with the real thing. For example, the "punches" can be resized so you can always mat them (like the curly label one here). Then, you always have a perfect bow. There isn't a Garden Green ribbon in "real life" either. Then, I didn't have to worry about the expense of using up all my brads either. One tip--give elements a drop shadow to add to the 3D illusion.

For the project itself, I was able to print out 10 of the white part on a piece of whisper white cardstock. Then I matted it with Garden Green cardstock folded over a cello bag of candy corn.

The only tricky thing is that MDS doesn't let you "divide" up a stamp yet to crop or color only part of it. However, because it does let you open an element in a different photo editting program, I was able to open the project  in Photoshop Elements to color only the pumpkin "Pumpkin Pie". In MDS, click "Export to jpg" under "Share Project". Then just find the jpg to open it in your photo editting program.


Share/Save/Bookmark

Tuesday, September 29, 2009

Shrink Plastic Halloween Earrings


Aren't these fun? The images are from the current SU! set "Batty For You" & the retired set "Bitty Boos." I made them with black shrink plastic (like Shrinky Dinks). I really like the black because I don't think it looks obvious that it's shrink plastic.

First, stamp the image (straight up & down--it's a slippery surface--you can sand it in a criss-cross pattern to prevent sliding if you don't have a steady hand). On black, I recommend Chalk Inks...they showed up much more vibrantly than Craft or pigment inks.

Then punch the image out (I used a 1 3/8" circle punch for the image & a 1/8" hole for the jump ring). Be very careful when punching because the ink can smear. Also, make sure you didn't get ink on your punch because then you could transfer it to the next image. Next, all you need is a heat tool to shrink them. I keep a paper piercer in the little hole to keep the plastic from blowing away when I'm trying to heat it. The finished size is about 1/2" in diameter--perfect for casual earrings.

Finally, just add jump rings & earring findings. Going to a Halloween party? Give the hostess a pair of  "The ghostess with the mostest" earrings :)
Share/Save/Bookmark

Monday, September 21, 2009

Fall Festival Halloween Necklace


I've just been confirmed to participate in a Fall Festival at the Brambleton Town Center in Ashburn, VA on Oct. 10, 2-7 pm--so I thought I'd post a Halloween project I made for it (I've got it for sale in my Etsy store too). I usually do Christmas fairs so it was fun for me to make some Halloween items. Come visit me if you're in the area!!

I'd make some glazed mini-domino pendants with this same skeleton and found out that boys liked them so I decided to make some that were a little simpler and geared towards the tween set with the leather necklaces. I colored them with chalk inks and dabbed gently with my finger or a make-up sponge until the colors looked blended. Next, heat set the ink with a heat gun. I found if I did that before stamping the main image, the stamp doesn't slide and the image is crisper. So the main image was stamped with black Staz-On. I used a sharpie to color the sides black.

I invested in a Dremel hand drill and mini-vise that clamps onto my desk this summer so drilling a little hole near the top of the domino was a cinch. Then I used a jump ring to add the domino to the necklace. I also made a bunch of girly ones too--I'll post when I get better pics but here's one...an Irish Dancer:


Share/Save/Bookmark

Tuesday, September 15, 2009

Custom Photo Pendant

I finally had someone ask me to make a photo pendant of her grandbaby. I was psyched to try out a black and white photo on an Othello game piece (the back of the piece is black). And how could you go wrong with such a beautiful picture? The photographer is Kelly Mihalcoe.

This was my first time working with a digital print so I had some new challenges. Just like other papers, it has to be sealed first before you add the epoxy resin on top. I tried Mod Podge but found that it yellows the picture a little. Next, I used Krylon's Preserve It! in Matte Finish. It's kind of funny making a picture printed on glossy paper look matte, but whatever, that's what I had on hand & the epoxy made it look glossy again. Make sure you spray the front AND the back of the paper to seal it. Finally, I added a rhinestone to her hair for the finishing touch.
Share/Save/Bookmark

Tuesday, September 8, 2009

The Very Hungry Caterpillar Name Frame

I was asked to make a name frame for a little boy with an "Eric Carle"-themed bedroom. Hmmm. This is what I came up with:

SU's retired "Tart & Tangy" set was perfect for this. I punched holes through them to mimic the book. Then, the retired "Good Morning Sunshine" designer paper had this pear paper. I also used the coordinating pear stamp from the "Cheep Talk" set.

But the real challenge was how to make the caterpillar. Once I figured out how to achieve a similar look to the book, it was easy. I simply rubbed some craft spots across glossy paper (which came out looking like brushstrokes), then punched 1" circles out of each colored "stripe" on the paper. For the body I did a stripe of Old Olive & Summer Sun & a stripe of Garden Green & Night of Navy then alternated the circles. For the head, I made a stripe of Ruby Red with just a little Garden Green. The feet & antennae are horizontal punches in Close to Cocoa & Lavender Lace. For the eyes, I just punched holes in the red circle, then put a circle of Garden Green cardstock behind it. Then I drew around the eyes with Summer Sun marker (it just pushed the craft ink out of the way on the glossy surface). The frame, by the way is 12" x 5" & the Alpha Set for the name is Schoolbook Serif (I used a Stamp-a-ma-jig to get it nice & straight & Black Staz-On for a quick-drying crisp image).


Share/Save/Bookmark

Monday, August 31, 2009

Mucha Resin Link Bracelet

I've expanded my jewelry-making to bracelets now. This is a link bracelet made with Alphonse Mucha images--I just love the art nouveau look! You can really use any images--your own photos or punched designer paper.

Since I bought these images as a digital collage sheet (from www.etsy.com --where I bought the bracelet blanks too, by the way), I had to print them on my computer, which required a step to seal them before adding resin. I used a Krylon spray specifically for protecting photos. After printing the images, spray both the front and the back of the paper, let it dry & then punch or cut them out.

They were already in a 3/4" circle size in pdf form but I needed them to be 11/16" to fit perfectly inside the link. I figured out I could re-size them by opening the pdf & then using the pdf photo tool to copy them onto the clipboard--IMPORTANT--make sure the "view" is more than 100% to maintain image quality--I put it on 150% just to be safe. Then I inserted the copy from the clipboard onto a blank 8 1/2" x 11" photo in Adobe Photoshop Elements. Nest, I resized the whole thing so the circles were 11/16" (by making the ruler visible). Then I saved it as a .tif so as to avoid any compression of the file. Next, I opened up Microsoft Publisher & inserted the tif onto a blank letter, resized the photo to letter size (this is to make sure it still prints to be the right size) & saved it as a pdf. I found that it still printed the best quality as a pdf rather than if I just printed it as a jpg--I'm sure other more computer savvy people can figure out their own way but if all you have is Microsoft Office & a non-professional photo-editing software, hopefully this will work for you too. Alot of these collage sheets are already sized for use on certain pieces (like scrabble tiles or dominos) but if you know how to resize, you can buy one size & re-use it!

Since I could not find a 11/16" circle punch to save my life, I simply had to cut the circles out. It was worth it though, because it's easier to add resin when the image fits nicely in the tray. So, the last step, of course, was to add my Colores Doming Resin--let it cure & viola--cute bracelet!

These five Mucha ladies represent the five months of my family's birthdays--so it can be a nice personal present. Below is a (little fuzzy) close-up of "April."


Share/Save/Bookmark

Sunday, August 23, 2009

Outdoor Craft Fair: the Good, the Bad & the Ugly

Saturday was the first time I’d done an outdoor craft fair (but I’ve done indoor ones for about four years now) & I have to say—not a big fan. The event was the first annual Catholic Heritage Festival for the Diocese of Arlington so there was a lot more going on than just the vendors. Here are my reflections on my experience as one of them:

So the Good—Friends & Family: my friend & downline Areana had a table with me and it was nice to share the day with her. More friends stopped by—our friend Erin, who isn’t even Catholic, drove out with her family. My family came to visit and there were kid activities to keep them happy and they got to see me “in action.” My friend JoEllen, her husband & four young kids helped me pack up quickly when the festival was closed due to a storm coming. I also met a few new stamping diehards for my newsletter and got nice compliments on my display.

The Bad: I couldn’t sleep the night before because the weather forecast was poor and I was sure they’d cancel it completely—kind of stressed me out because I’d already packed the car and worked so hard for so long. The weather held off for quite awhile (albeit it got annoyingly windy) but then they did cut the festival short by about 2 hours due to a lightning storm coming (metal tents=bad place). We were on top of a hill too—not good. There wasn’t much activity the first hour and a half either because there was a mass & mass + shopping = sacrilegious. So there was only about 2 hours of “shopping” but then a lot of people didn’t come to the festival to shop—therein lies the risk of doing a craft fair in conjunction with a larger event. So, while I got some nice feedback, the sales were less than hoped for L. I know it couldn’t be helped but I left a little discouraged nonetheless. The bright side is that I got all my stuff packed up before the rain hit (rain + paper products=disaster).

& the Ugly: So I managed to escape unscathed (ironically, it was at the Bull Run Park near Manassas, site of the famous Civil War battle, and there was a shooting range nearby that I could hear as I drove away—adding to the drama or maybe I’m just easily amused), but then had the perfect end to my day AFTER pulling into our dry garage. When I opened up the door to the van, my box full o f paper items fell out and dumped everything in a puddle that had formed from the rain on the van! Triage was quick. Then, when I brought in my big magnetic board with all my domino magnets on it, I noticed little teeny ants crawling all over it! A sheet I’d left under a table and placed on top of the board had collected the unwelcome visitors & in our rush to pack up, had not been noticed. Sigh.

The Aftermath: Luckily, after the initial shock of puddles and ants, in the end there wasn’t much lasting damage. I did do some soul-searching regarding my crafting hobby though. My conclusion—when this seems to feel like a job, it’s time to cut back! If anyone has insights on how to moderate/balance making enough stuff to have for a craft fair yet still remain sane/don’t bite your kids heads off—please share!!! I’ll be working on that over the next few months (Lord knows I have enough stuff now for the rest of my holiday shows!)

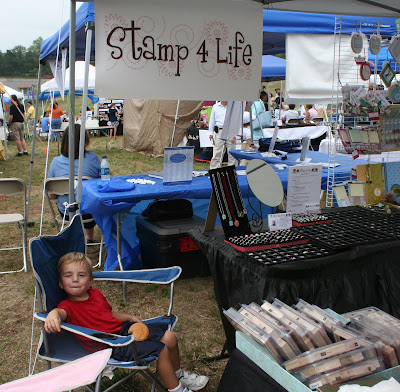
Me & my Shtuff. I went a little nuts with Vistaprint —notice the matching banner & my t-shirt. Then, I also got new business cards, business magnets, a car magnet AND a hat (my daughter was wearing it). It was all “Free” (just paid more than usual shipping). Vistaprint isn’t paying me for this, but it’s great fun if you want a few more marketing items!

Areana's Table. Check out the fun headbands--made from sealed paper! We'll get her to guest-blog about them :-)

Barrettes anyone? The Disney Princess ones were popular.


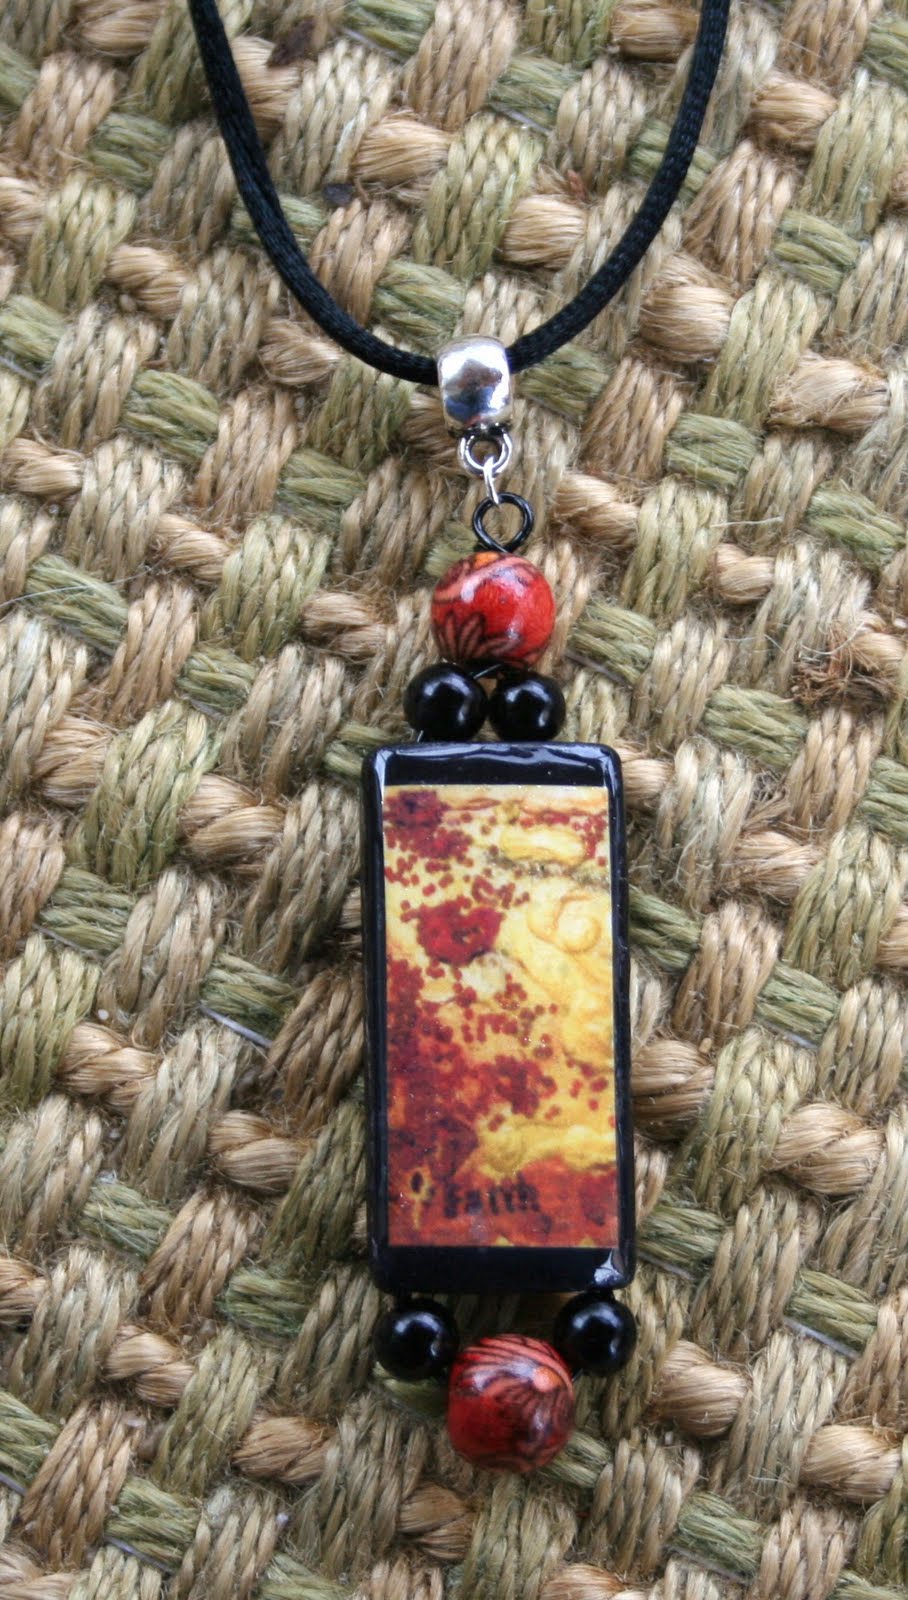
Quality Control. Then, as you can see, I've become obsessed with making jewelry...think I have enough rings & pendants??


Share/Save/Bookmark

Tuesday, August 18, 2009

Embellish It Yourself Mini-Albums


Here are a few mini-albums for Saturday's craft fair. These were made with SU!'s Scallop Circle and Clear Scallop Square dies. I first used SU's Glue Stick to adhere the paper on chipboard (mostly the stuff that comes with packs of paper) before running it through the Big Shot. Only the front and back are chipboard and then I added cardstock inside for the pages (also run through the Big Shot).


I tried a variety of themes and then created a little bag of coordinating embellishments so people had a choice. For example, in the first picture, the image from "Special Blessings" lends itself to a wedding, baptism, first communion etc. so I offered all those sentiments. Next, I broke out the Sticky Cuts and glitter for tween albums.


Finally, I used the new "Pony Party" and the retired "Prehistoric Pals" for a girl or boy birthday album respectively. For the boy embellishments, I used the new "Look Who's Turning" stamp set and provided all the numbers so someone can pick the age the kid is turning. This project makes a great gift and still lets someone else add their personal touch.
Share/Save/Bookmark

Monday, August 3, 2009

Craft Fair Countdown...

Well, my first craft fair of the season is less than three weeks away (the Catholic Heritage Festival at Bull Run Park, Manassas, VA Aug. 22--come visit!) and I'm going on vacation next week so here's a "double post" since I'm going to try my darndest to avoid the computer for awhile--some photo binder clips I've made to sell and a new display idea I picked up fromKerry on splitcoaststampers.com. (Love the free sharing of ideas on that site!!)

First off, some jumbo binder clips (from Staples) that I altered to hold photos. I used retired Simply Scrappin' Kits for these. My SU! glue sticks hold the paper on very nicely & then dimensionals pop the images out. Note the snowflake on the Christmas one--that's the new SU! Snowflake punch.

This next version of the photo binder clips uses some that were on clearance at Staples. They had a round end and were too top-heavy to stand upright so I turned them on their sides. I used the Batty For You stamp set and a random soccer ball stamp I had. Luckily, SU! colors coordinated nicely with the clips. I dipped the images in a Versamark Pad, covered in Clear Embossing Powder and embossed (2 layers to get a nice smooth glass-like appearance).


Now, here's a little preview of a new display idea I got from Kerry: using upended wire shelving! She used these for a craft fair to add height and I loved the idea. I also have this area in front of the folding doors of our furnace and it was the perfect solution for adding more organizational space. I can still move it easily if we need to service the furnace and I can then use it for my craft fairs too. These are 6 ft. high & tied together with plastic cable cord ties--got it all at Lowe's. Right now they're just leaning against the doors but for the craft fairs, I'll use Kerry's idea of bungee cords to secure them to the table since there won't be a wall to lean them against.
I got the "S" hooks and long narrow basket from the IKEA kitchen section. My punches are on a towel rack I found at a thrift store. I rigged this other wire basket with some yarn so that it'd hang. More counter space was saved by using S hooks to hang my brown & pink organizer tote too.
See you in a couple of weeks :)


Share/Save/Bookmark

Wednesday, July 29, 2009

Notebook & Beaded Pen Sets

I took a break from my making-jewelry obsession to make a few altered composition notebooks with matching beaded pens. I like making these because I can do a lot in front of the TV :)

I made these for my craft fairs last year too and sold out of them so y'know--had to make more! (I sell them for $7 if you're curious. When I sell them alone, the beaded pens go for $2.50.) I always stick with Stampin' Up! designer papers, ribbon & stamps for these because everything coordinates easily,which saves me a lot of time when creating in bulk.

The first set is from the retired Rockabilly Specialty Paper (with tweeners in mind). My seven year old son wants the rock star one of course. That stamp is from the "Little Something" retired hostess set.

This second set uses the retired Good Morning Sunshine paper & coordinating stamp ("Cheep Talk") & retired rub-ons. I also used the Scallop Circles #2 die & the Circle Scissors Plus.


This last one uses the retired Raspberry Tart paper and more dies--SU! Birds & Blooms Sizzlet and SU! Sweetest Stem embosslit.

Few nitty gritties...some people make these by folding the paper over and then covering the inside covers. I simply cut very close to the edge, adhere (with SU! glue sticks), trim off excess and sand the edges. My 5 year old daughter has a notebook I made a year ago and it's withstood her um, lack of order without coming apart so I stand by my methods. My year old pen has held up well too.

I use Pentel RSVP pens--some people roll the paper up and insert it inside the pen. I didn't think you could see much of the paper, so I use sticky tape (the 1 1/2" wide Scor-Tape) to adhere it to the outside of the clear barrel and then use the tape again to adhere the ribbon & then clear micro-beads. SU! now sells Sticky Sheets so you could also cut those to size and use them too. Be sure not to adhere the bottom of the pen while making these because then you can't open them to refill the ink (one of the main selling points of these pens!) Also, add the paper & tape with the cap on--otherwise, you might not be able to close it all the way if you take it off. I also use sticky tape (the 1/4" kind) to adhere my ribbon to the notebooks.

Finally, I love to add some final bling to my images so if you look closely, you'll see I added Stickles to the first two sets and colored half-back pearl embellishments to the last one.
Share/Save/Bookmark

Thursday, July 23, 2009

Ribbon of Hope

Do you watch So You Think You Can Dance? Well, if you saw last night's episode, Ade & Melissa, to much acclaim, did a beautiful dance about a woman who has breast cancer. How ironic that I was putting the ribbons on my new domino pins made with Stampin' Up!'s Ribbon of Hope stamp as I was watching it!

I added this set (which is really not a set, just one individual stamp on the last page of the catalog for just $7.95) to my last order on a last minute whim and I'm so glad I did. Did you know there's a color associated with pretty much every cause? It's an interesting thing to google. Anyway, that's a versatile stamp.

So, pretty similar to the Christmas ornament domino pins or magnets I make for craft fairs, I decided to do something with this set. I'm making them into pins & I'll also attach an elastic cord so they can be ornaments too. I made these with Staz-On inks and then covered the whole domino with Iridescent Ice embossing powder. For the breast cancer pin, I just wrote "HOPE" myself with a black sharpie.

A few tips when working with the Staz-On. Because it's a solid image stamp and the domino surface is slippery, the stamped image looks mottled at first. To smooth it out, I used a blender pen. It also pushed the color around enabling me to get that darker around the edges dimensional effect. If you get a stray mark outside your image, a Versamarker will clean it up! The yellow image was really light after embossing, so for more definition, I outlined it with a darker yellow fine-tip Bic Mark-It permanent marker (yes, you can write OVER the embossing powder, pretty cool). Since SU! doesn't make a yellow ribbon, it occurred to me to make the ribbons red, white & blue for the "Support Our Troops" pin. I live in a military-heavy area, so here's hoping these go over well :)


Share/Save/Bookmark

Monday, July 20, 2009

Deal of the Week!


This week's deal is item #112454 Styled Vanilla Hodgepodge Hardware on page 178 of the SU! Idea Book & Catalog! Regularly $29.95, from July 20, 10 AM (MT) through July 27, 9:50 AM (MT), it's only $18.99!

Share/Save/Bookmark

Friday, July 17, 2009

Scratch, Sniff & Smear!

Let's do a card, shall we? This one uses the new in-colors, Circle Circus set and Razzleberry Lemonade DSP. I know, it's been awhile...

For my last technique club, I got a request to do a "scratch & sniff" card. So, this is my good faith effort. It's a really easy technique to do but the results are mixed I think.

First, you mix 1 teaspoon kool-aid with 1 1/2 teaspoon clear embossing powder--make sure you use the kool-aid with no sugar because you don't want a carmelized card after heat embossing. Stamp your image in Versamark or with craft ink; sprinkle on mixture & heat set.

The problem I ran into was really having the right color kool-aid and smearing--I used the orange from the Tart & Tangy stamp set but the "Mixed Berry" kool-aid is purpley, so I had to settle for what hopefully passes as a red grapefruit. Then, the kool-aid granules kind of smeared a bit when you touch the image. Maybe it helps to wait a little before handling the image? I don't know because I was impatient. The good news is that it really does smell good & stays that way for a while (good to know if you want to mail it). My friend Danielle can attest that it tastes good too (she couldn't resist, it smelled too good--hee).
Share/Save/Bookmark