
I know it's only August, but I've started getting ready for the holiday craft fair season by making various projects to sell. (I'm trying to get a bunch done before the new catalog & school craziness starts. Plus, I'm going to try to hold more events at my house this fall, which'll keep me busy!--Go to the "Classes" link above for more details or email me!!)
Anyway, I decided to try my hand at "beaded pens"--a lot of crafty ladies say they sell well, so that's good enough for me. I think they should be popular with tween girls who seem to love little things like this--my 4 yr. old daughter certainly tried to abscond with a few!

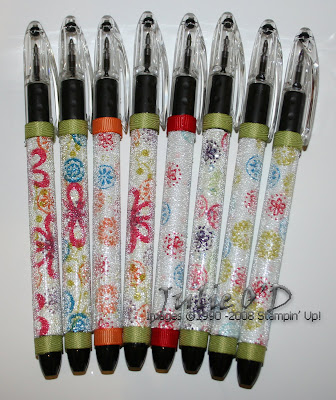
I stamped on Avery labels (cut to fit) using the "Always" stamp set. You need smaller images for this. Then you wrap sticky tape (I used a 1" width & then added a 1/4" width cuz I'm too cheap to buy the full sheets). Roll in clear microbeads. I finished it off with coordinating 1/4" grosgrain or twill ribbon. These are Pentel RSVP pens by the way.
 I tried silver microbeads with these. I'd found some Scotch tape that's meant to hold up posters & small frames super cheap; they were thicker & cushiony, so I thought I'd try a different tack. First I put on the rhinestones, then rolled in the beads. For some of them, I filled in the gaps with glitter too. They're pretty darn sparkly in person.
Here's another variation--with these, I used Designer Paper (the retired "Cerise"), then covered composition books to match so I have a set to sell. The designer paper is trickier than the labels because you have to put the sticky tape on both sides to make sure it adheres to the pen. At first I tried running the paper through a Xyron Sticker Maker but that wasn't sticky enough. I figured that out when I saw them "splayed" open the next day---Horrors!! Anyway, that's why I'm not making as many of these :) Covering the notebooks is super-easy (shhh!). You just cut the paper a tidge bigger, glue stick the back (the SU! glue sticks rock for this!), stick it on the notebook & then gently sand the edges so it looks perfect. Then embellish. I used ribbon to hide the "seams" where different papers meet.

Finally, here's my favorite--made from the now retired Designer Paper "Enchante" I believe. Of course, it was my daughter's fav too, so well, you pick your battles, right? Besides, after I gave it to her, I saw that I'd put stuff on upside down! Too funny. I stamped the flowers using my markers on the stamp (from "Carte Postale"--now retired--I tend to use up retired stuff for craft fairs & the retired sets I keep are my favs anyway). The purple pen was my very first attempt--I used all purple glitter on it (sticks pretty well, actually). That is also now in my daughter's possession.
Okay, so the new Catalog is coming out on Monday, August 11!! There are tons of promotions going on with it too ($99 starter kits! 15% off a bunch of new sets!) Be sure to visit my SU! website for more details!!


Almost makes me wish I was back in school! These are so cute Julie!
ReplyDelete